

RV Fresh Water System Winterizing
RV components can be damaged from the effects of freezing. Protection of the RV plumbing system and related components is especially important.
A local RV dealer or service tech is best suited to answer any questions as well as providing specific information on winterization and storage your RV that may be particular to the climate in your area.
There are two generally accepted methods of winterizing an RVs fresh water system.
- Compressed Air (Dry) Method Uses compressed air to blow out any remaining water in the system after draining the system of all water. This method requires an air compressor and appropriate adapters.
- RV Anti-Freeze (Wet) Method Uses RV approved, nontoxic, potable, anti-freeze in the system and does not require any special tools.
We'll cover the procedures for both methods in turn.
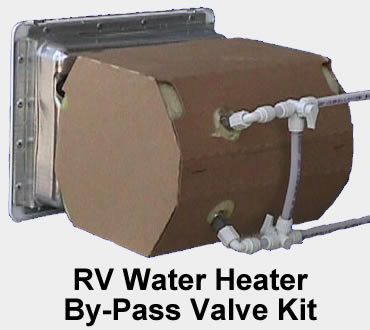
Many late-model RVs include a by-pass valve kit that allows the plumbing system to bypass the hot water heater, reducing the amount of anti-freeze that will be needed Without a by-pass kit installed, an additional 6 10 gallons of anti-freeze will be required.
If your RV doesnt have one we recommend you install one. The by-pass kits are available at most RV service centers for a reasonable price and can be installed easily before winterization.
RV Winterizing with Compressed Air (With By-Pass Kit Installed)
 If using the compressed air method, a special adapter should be purchased to allow compressed air to be delivered through the city water fill. These adapters are available at most RV supply stores.
- Purchase 2 gallons of RV non-toxic anti-freeze.
- Drain the fresh water tank and empty the waste water holding tanks
- Turn water heater by-pass valve to by-pass position. (The by pass valve is located near the water heater incoming lines The rear of the water heater is usually accessable behind a cabinet door but you may have to remove an access panel depending upon the design of your RV.
- Drain water heater
- If installed, remove water filter from assembly and discard. Install diverter if included.
- Open all faucets, including shower head sprayer, toilet flushing device and any other water lines that are closed.
- Turn on the water pump for 30 seconds to clear out any water in the lines.
- Connect an air hose with an adapter to the city water fill connection.
- Set the pressure no greater than 30 pounds and blow out the water lines until no water can be seen coming out of the fixtures and lines.
- Pour RV anti-freeze into drains, p-traps, toilet, and tanks.
Winterizing Your RV Plumbing System with RV Anti-Freeze (With By-Pass Kit Installed)
- Purchase 4 -6 gallons of RV approved, non-toxic, anti-freeze.
- Drain all tanks, fresh water and sewage tanks*(see pg 6-12).
- Turn water heater by-pass valve to by-pass position. (The by pass valve is located near the water heater incoming lines an access panel may have to be removed depending upon the model.)
- Drain water heater.
- If installed, remove water filter from assembly and discard. Install diverter if included.
- Pour an amount of RV non-toxic anti-freeze into the fresh water tank to fill the tank above minimum water pump operating level. (Use of a long funnel may be helpful) Add more, if necessary, during procedure.
- Turn on pump switch and open the cold water side of all faucet fixtures. Leave open until the anti-freeze comes out (generally, pink in color). Repeat for hot water side.
- Flush toilet until anti-freeze begins to flow into the bowl and then pour one gallon of anti-freeze down the toilet to winterize the black tank.
- Pour anti-freeze down each shower/tub, lavatory sink, and kitchen sink to fill p-traps.
- To winterize gray tank(s) pour one gallon down each related sink drain.
De-Winterization / Removal of Anti-freeze
If purchasing a recrational vehicle which is winterized with RV anti-freeze, or you had you existing RV winterized before winter storage, the plumbing system must be flushed and sanitized prior to use. Do Not Attempt to turn on water heater if system is winterized.
Perform the following prior to attempting to operate the water heater or use the plumbing system.
- Drain all holding tanks, fresh water and sewage*
- Attach garden hose to fresh water fill and fill tank.
- Turn on pump switch and open cold water side of all faucet/ shower fixtures. Leave open until water runs clear. Repeat for hot water side.
- Flush toilet until clear water runs into bowl.
- Dump tanks again.
- Sanitize water system. (See page 6-3 )
- If a water filter is installed, drain lines, remove filter assembly, clean and reinstall with new filter.
- When ready to use the water heater, turn by-pass valve to open position to allow water to enter and fill the hot water heater tank.
|
|
Get tips on the RV lifestyle, RV equipment, campgrounds, sights and attractions, safety and just about anything else useful RVers.RVTipOfTheDay.com |
Stay Up to Date - Follow Us
|
Join Our FREE RVBasics Email Discussion GroupGet current information about the RVing lifestyle, and the RV industry from your fellow RVers. You can also post your own questions. We never share your email address with anyone. |